
Hi everyone! Today I'm sharing the new Ironing Board Cover I made. I'm so in love with it!

But first, I wanted to Thank You all for your super duper sweet comment on my little laundry closet. They really make my day! I'm getting so close to the end and can't wait to reveal the whole room and how it has come together. Lots of you have asked if it makes doing laundry more fun.....and it totally does! Every time I open the doors it makes me smile. :0) My little closet is right off the kitchen and half the time I leave the bi-fold doors open just so I can see all the cuteness!
Secondly, I wanted to share my template with you for my "Clothesline Fresh" sign.

I know some of you have been patiently waiting for this and I thank you! It is done in pdf format so you will need Adobe Acrobat Reader to be able to open it. It is a free program and is very easy to download if you don't already have it. This is sized to fit a 27"x8" sign, but can easily be reduced or enlarged to fit your sign. Please know that there are three pages, so make sure you print them all and then tape them together to create one long piece. You can read the rest of the tutorial on how I created my sign HERE.
Click on the photo below and it will take you to my box.net account where you can download the file. Be sure let me know if you have any questions/comments!

I also had a question on the font. I used CK Society, but I looked it up and it is unfortunately no longer available.
Now, on to my
IRONING BOARD COVER!
If you missed my other laundry Room Projects, you can see them HERE.
This guy is what started my whole Laundry Closet decorating! I was just going to do the cover and then when I saw all the other yummy fabrics in the Nicey Jane Collection, I knew I had to do more! The funny thing is, my closet is so small my ironing board doesn't even fit {tears}. I was able to incorporate the fabric into the closet in another way, though. It is my favorite print and I had to get it in there some how! There are surprisingly few tutorials on how to make covers out there, so I decided to show you how I made mine!
{disclaimer: I'm sorry about the quality of the photos! My soldier has been gone training for 3 weeks and when I couldn't sleep one night I got up at midnight and started on this~LOL! Midnight = No Light = Not So Great Pictures}
{STEP 1}
Pick your fabric ~ You will need 2 yards. Make sure it is 100% cotton. Using a fabric that is blended or made with something other than cotton may melt when the iron is place on it. That would be sad after all the work you put in to creating it!
Remove the old cover off your ironing board and lay it flat on your fabric. I was so excited it only took one side of my fabric. I was able to put the other half to good use later on!

{STEP 2 &3}
I wanted my cover to be a little bit bigger than the original, so I a marked 2" all the way around the cover and cut it out. If you are happy with the size of your original cover, you can probably just do 1". This will allow you to create a casing for your string.

This is what mine looked like when it was all cut out:

{STEP 4}
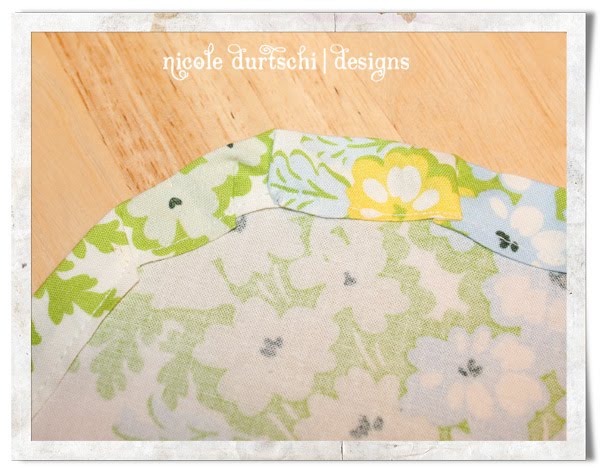
Now you need to create your casing so that you can cinch the cover closed. I folded the edge under 1/4" all the way around (to hide raw edge) and then folded again 3/4" and ironed and pinned in place.

{STEP 5 }
Sew close to the edge (I think I sewed about 1/4" from the edge). The curves can be tricky. I just pleated mine slightly. Remember it doesn't have to be perfect as you won't even see it.

Here is what mine looked like all sewn down:
{STEP 6 }
Remember to leave an opening between where you started and where you ended so that you can thread your sting through the casing. This is usually done on the square end of your board.

{STEP 7}
Next attach a safety pin to the end of your cord/string of choice. You may even be able to use the cord that came with the original cover. My soldier has a ton of parachute cord laying around, so that is what I used. Remember to melt the ends with a lighter if it is made of something that will fray. Thread your cord all the way through the casing and out the other end.

{STEP 8}
Place the padding back on your board and then fit your new cover over that. It is important to make sure you put the padding back on!

{STEP 9}
Pull cord tight and tie closed. Your fancy new ironing board is all ready to use!

I just adore how this turned out and I'm soooo very excited I got the pattern centered perfectly on my board! It is the perfect addition to my laundry room {even if it doesn't fit in there}!


Thanks so much for stopping by. Have a wonderful day!

I linked up to these fun parties!


23 comments:
This would be so cute... if I ironed any clothes :) Thanks for the file for the sign I will be grabbing this right away!
Your ironing board is now cute enough to display. I need to find some cute fabric and make one for my home.
I love the fabric choice! I need to update mine now. Thanks for the inspiration!
Great job & nice of you to share the tutorial!
I love how all of it is coming together so well and you are doing a fantastic job! Thank you so much for the sign. Im so excited about it and can't wait to get working on mine!
Thanks for the inspiration. I will be thinking of your beautiful laundry closet as I tackle my families' laundry today. Sooooo glad to hear that perking up the room perks up the laundry job. Thanks for sharing all the pics and tutorials too.
Thank you so much for linking up to Just Something I Whipped Up today! :) Love that ironing board cover. I recognized the fabric right away. Heather Bailey rocks. lol
Super cute blog too. Adding you to my blog list so that I don't miss a post. :)
Very cute and I LOVE that sign! Thanks for linking to Craftastic Monday:)
Wow, this turned out so great! Love the colors!
CUTE!!! I love your blog! Great ideas! I am your newest follower. Stop by Sassy Sites and say HI! :)
That is cool. I want one too! I'm visiting from the creative girl link party:-)
Thanks for stopping by at em-belle-ish :). I am glad to hear that you are enjoying that "whew, that's much better" feeling after organizing your craft room. Now that we both have room in our spaces, we can look for the beautiful things for the finishing touches - that's so much more fun, don't you think?
Adorable! You have the cutest laundry room ever! Wanna come over my house and help! ;) lol
I haven't been this excited about the laundry room for a long time. You really make me want to make mine pretty too. I am so excited to see the final thing. The pattern you chose is beautiful and goes so perfectly with the other parts.
Thanks for linking up to Take-A-Look Tuesday - I featured you today! - Mandy, www.craftedition.blogspot.com
Hi Nicole,
Congratulations, your cover made this week's Top 5 Hits at Singing With Birds. Come check it out, grab a button and have a great weekend!
Nice job!!! I will have to save this one on my list of things to do!!!! Never thought about being able to recover my ironing board!!!
OK, I am inspired! I have been hating on my ironing board cover for a looong time. Your tutorial inspires me to make my own rather than buying a new one! Bookmarking your blog for future reference! Thanks so much for sharing.
In love!! I just stumbled upon your blog and I am in love with your ideas. I am so inspired. I just got a sewing machine and I am currently in the middle of my laundry room redo :) Can't wait to buy some cute fabric!
Found you through Path Less Traveled! She linked up a cover she made using your tute! Love this! I have a small ironing board that need to be recovered in a major way! Thanks for such a great tutorial!
I have the saddest looking ironing board cover and as of today I have made my mind up to redo it. Sadly, I don't know if I little cover that came with it even has ANY padding!!! UGH I think I have just been ironing over the fabric to metal. Oh no! Any suggestions what I should buy to replace the non-existing padding now?
I'm so glad I found this, my cover had just fallen apart! I can feel a project coming on!
This is great! I just linked this tutorial to my site so I can tell others about your site! I will back for more! I love your blog!
Post a Comment