Showing posts with label digital scrapbooking. Show all posts

Autumn Sign

I love decorating for fall, and now that I'm done with my calendars I can finally start! Since I'm getting such a late start, I decided to skip Halloween this year and just do fall because I can keep it all out through November. I was working on decorating my hutch in my dining room and was looking for something that would be the perfect finishing touch. When I saw the 12x7 frames in the cheapy frame section at Wal-Mart, I knew just what I wanted to do!

I basically created a scrapbook page sized to fit in my new frame. I used a mix of Autumn kits by Shabby Princess and some of her new Autumn Word Whimsy. I love the Word Whimy because it does all the hard work for you-lol! I printed it out at home on photo matte paper...since it was larger than a letter size piece I had to print it in two parts and tape it together. I then cut it to size, inserted in my frame and placed it in my vignette! I just love how it turned out and am excited to switch it out with the different seasons.
The Falloween Confection Collection I helped design for The Shabby Shoppe also just came out! It turned out so cute and I'm having a hard time trying to decide which pieces we will be using for Liz's school treats this Halloween!
Thanks for stopping by and have a great day!
Parties I joined:


2011 Calendars!

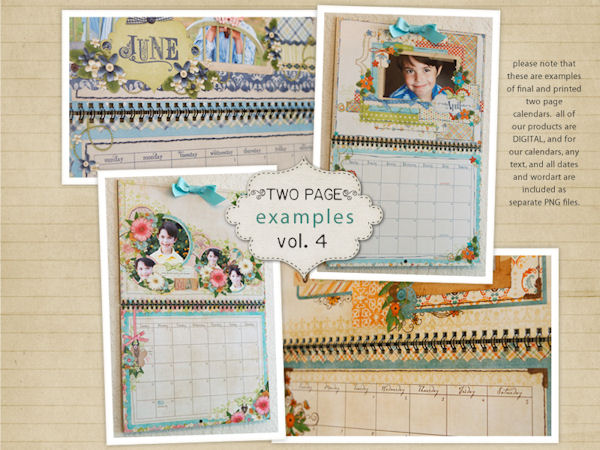
I'm so excited to finally share these! Shabby Princess and I have been working on these non-stop for the last couple months....which explains my sudden disappearance! I've been creating these calendars for the last 5 years, and I can honestly say that these are my most favorite that I have done! Each page is designed so that you just have to pop in your own pictures, add any journaling you would like, and print!  I'm so excited to share these, so be warned that there are lots of pictures! I linked up each picture to the The Shabby Shoppe incase you want more details on each one. Shabby Princess has also put together an amazing Information Page on our calendars and how to use them. Soooo excited! Eeeek! Hope you like them as much as I do.
ONE PAGE CALENDAR:

TWO PAGE CALENDAR:
CD CASE CALENDAR:
 
POSTER CALENDARS-SCRAPPY STYLE:
POSTER CALENDARS-GRAPHIC STYLE:
 
POCKET CALENDAR COVER INSERTS:


Thanks so much for stopping by to take a peek and letting me show-off a little! :)
Photo and Example Credit: Shabby Princess/The Shabby Shoppe

DIY Alphabet Poster

There are a million alphabet posters out there, and I love a lot of them. But, I decided to make my own 1.Because we're on a budget and 2. I could personalize it for my girl's room. I just used random digital scrapbooking elements and fonts I already had on my computer, designed it in Photoshop, and then had it printed in poster size at Winkflash.

I'm pretty happy with how it turned out, and the girls love it too!


I joined these fun blog parties:

Template Challenge

It is my turn to host the Easy-As-Pie Template Challenge at The Shabby Shoppe this month. I really love how the template turned out, and I hope you do to! Check all the details Here on how you can win a $25 Gift Card to the Shabby Shoppe just by creating a layout with the template! You will also find some amazing layouts that the creative team came up with using the template and a FREE quick page!
A quick peak at my layout and your Free quick page!

Happy Scrapping!

Laundry Closet Makeover - Part 2

Welcome back to my Laundry Closet Makeover! If you missed Part 1, you can see it HERE.
Today I'm going to share two more projects!
First:
Laundry Rules Sign
I first saw these laundry rules on etsy, in vinyl form. Although I like the idea of vinyl, I need to use every opportunity I can to inject color into my rental white laundry closet. I decided to put my Digital Scrapbooking skills to work and this is the end result. I couldn't love it more! I used a digital scrapbook kit at Nitwit Collections called "What's All The Buzz About". This is a bug themed kit, but I was able to pull papers and elements from it that worked perfectly with my color scheme. I created my sign at 8"x10" and had it printed at Walgreens. I used a frame I already had on hand that I had picked up from T.J. Maxx on clearance last year. 

Second:
Coordinated Clothes Pins
I have these sitting in an old jam jar on a shelf in the laundry closet. I don't used them, but they add a cute little decorative detail to the closet and I love how they match my fabric perfectly.
Here's the how-to:

Step 1:
Gather Supplies
Mod Podge - Decorative Paper - Clothes Pins - Scissors - Paint Brush
To make these coordinate with my Heather Bailey Nicey Jane Fabric, I simply saved the sample pictures from the internet and then printed them off on matte photo paper. Each square of "fabric paper" is about 4"x4". You could use fabric scraps instead, but my fabric choices have large patterns on them and you wouldn't be able to see them once adhered to the clothes pins. 

Step 2:
Cut Paper Strips To the Size Of Your Clothespins
Measure your clothes pin and then using your scissors or a razor blade, cut strips from your patterned paper. Be sure to make a strip for the front and back sides of the clothespin.

Step 3:
Adhere Paper To Clothespin
Using your paint brush, Apply Mod Podge to your clothes pin and the back side of your paper. Press paper onto your clothes pin, smoothing all air bubbles out. Trim sides if necessary.
Optional: Before glueing the paper to your clothespin, you can paint it in a color of your choice. I chose to leave my clothespin natural because it went with the over all feel I was trying to create in my room.
Optional: Apply a thin coat of mod podge over finished clothespin to seal it. Since mine I strictly decorative I didn't do this, but if you will be using these definitely apply a protective coat.

Step 4:
Admire
Fill an empty jar with your clothes pin, step back and admire your perfectly coordinated accessory!
 
Thanks so much for stopping by and have a great day!

Linking to these fabulous parties:

Family Man Wallet

Here is my newest project, Family Man Wallet Album,  just in time for Father's Day! Usually I buy templates to create my hybrid projects, but I created this one completely from scratch! It was definitely challenging at times, but it turned out amazing in the end, if I do say so myself!

One again, the fabulous Shabby Princess Printed and assembled the sample project!

Teacher's Pet Gifts

I can't believe I forgot to post these...they were released last week. I think the projects turned out so CUTE and I love that they aren't super "teacher-y".
This first one is a little Gift Set. I used the Summer Cottage Kit and then Shabby Princess made me a cute little apple embellishment to use. I can't wait to give these to L's teachers in a cute little bucket.
And here is another little Accordion Album that highlights events through out the school year. I'm actually going to mail this one to L's teacher back "home".
Thanks to Shabby Princess for printing and assembly and photographing everything!

Rain, Rain Go Away

I've been working on all kinds of projects, but need to get the pictures off the camera! I made this layout of Liz last night. Dan and I were looking through old pictures the other night when I came upon this one from a couple years ago. She was not thrilled about taking pictures in her rain coat, as you can see. Even though she isn't smiling, this is still a favorite picture of mine. I think a lot of times we tend to focus on scrapbooking the happy memories and we forget about many of the "real life" moments.

Template Challenge

I'm hosting my first ever challenge on the new Shabby Princess Blog! Just use the free template to create a layout and you will be entered in to win a $25 gift certificate to the Shabby Shoppe.
You will also get the layout I created with the template as a quickpage just for playing. Here it is with our princess! Can't believe it has been exactly a year since Dan graduated. Time sure flies when you are having fun!

Mother's Day Projects

I have lots of projects to post on decorating our new home, but this is the last project that I finished up and have been dying to share! I think that these are some of my most favorite hybrid scrapbook projects that I have ever designed! For those that don't know, Hybrid Scrapbooking is a combination of Digital and Paper Scrapbooking. They are all super easy to put together and so tiny and cute and adorable. I designed these for the big Mother's Day release at The Shabby Shoppe. Although I designed everything, the fabulous Shabby Princess actually printed, assembled, and photographed everything WITH easy to follow tutorials. Enough talking....on to the goodies!

ACCORDION FILE ALBUM
This was our most favorite project! We LOVED it!
You can find it here.
BLOOM BOX~SPROUT
This little box opens up to show layers of little pages for all your photos. I had so much fun making this one.
You can find it here
BLOOM BOX ~ CLEMENTINE
Clementine is one of my all time favorite Shabby Princess Kits, so I had to make a box with it too!
You can find it here..
MOTHER WORD ALBUM
I've always wanted to create one of these word albums. It is designed to fit the chipboard word albums from SEI, but you can also just glue the pages to any chipboard type product you have at home. Cereal boxes work great for this! I'm totally going to make one of these for my desk, full cute pics of my Lizzie girl!
You can find it here.
 
SPRING CONFECTION COLLECTION
These are such an easy way to dress up sweet little treats for your neighbors and friends!
Find it here.
 
CLEMENTINE PIECE-OF-CAKE ALBUM
This guy took me 3 months to finish...of course you have to take into account that I moved across the country sometime during that 3 months! Lots of layering and tons of spots for your photos! These are great because the hard word is already done for you. You just have to add your photos and journaling!
Find it here.
And that's it! Everything was so fun to make and I hope you enjoy them as much as I do. I would love to know what your favorite project was!